To access Internet resources by user-friendly domain names rather than these IP addresses, users need a system that translates these domain names to IP addresses and back. This translation is the primary task of an engine called the Domain Name System (DNS).
The two primary software components of DNS are the name server and the resolver.The primary functions of the name server are to host the database (called the zone file) containing domain information and to provide responses to name resolution queries through authoritative responses or referrals.The primary function of the resolver software is to formulate a name resolution query or series of queries.
The primary DNS data is the zone file.The zone file contains information about various resources in that zone. The information about each resource is represented in a record called a resource record (RR). Because a zone may contain several domains and several types of resources within each domain, the format of each RR contains fields for making this identification.
Installing and Configuring DNS
The Active Directory Installation wizard offers to install DNS.
(Keep in mind that the Active Directory Installation wizard does not install a reverse lookup zone).
HOW TO CONFIGURE DNS FOR ACTIVE DIRECTORY
1. Click Start --> Settings --> Control Panel.
2. Double-click Add/Remove Programs and then click Add/Remove Windows Components.
3. In Components, select Networking Services and then click Details.
4. In Subcomponents of Networking Services, select the Domain Name System (DNS) check box, click OK, and then click Next.
5. In Copy Files From, type the full path to the Windows 2000 distribution files and then click OK.
To host Active Directory, you must configure DNS with a zone for the Active Directory namespace. You should create both zone types for a proper DNS implementation that is, a forward lookup zone and a reverse lookup zone. Read on to discover how.
Creating a forward lookup zone
To create a forward lookup zone:
1. Click Start --> Programs --> Administrative Tools --> DNS.
Windows 2000 launches the DNS Microsoft Management Console, from which you can perform your DNS administration.
2. Expand the DNS server.
3. Right-click the Forward Lookup Zone folder and choose New Zone.
4. Click Next to continue when the New Zone wizard appears.
The wizard takes the pain out of DNS administration.
5. Ensure that Standard Primary is selected and click Next.
6. Ensure that Forward Lookup Zone is selected and click Next.
7. At the New Zone page, type the name of your zone (for example, fordummies.com) and click Next.
8. Select Create a New File With This File Name and click Next.
9. Click Finish.
Creating a reverse lookup zone
To create a reverse lookup zone:
1. Click Start --> Programs --> Administrative Tools --> DNS.
2. Expand the DNS server.
3. Right-click your server and choose New Zone.
4. Click Next to continue when the New Zone wizard appears.
5. Ensure that Standard Primary is selected and click Next.
6. Ensure that Reverse Lookup Zone is selected and click Next.
7. Ensure that Network ID is selected, type your network ID in the Network ID field, and click Next.
8. Select Create a New File With This File Name and click Next.
9. Click Finish.
As far as Active Directory is concerned, your DNS server is almost ready

Saturday, March 15, 2008
How to configure ICS(Internet Connection Sharing) in server 2003?
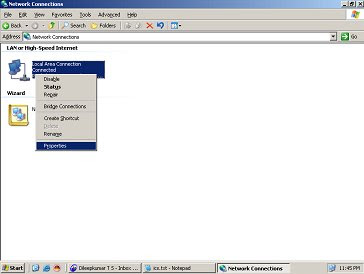
1.First you must turrnoff Firewall(for that you must do the folowing steps)
A)Right click the Local Area Connection and take Properties
B)Click the Advanced TAB
(Windows Firewall) Settings(click this tab)
Off(select this radio button)
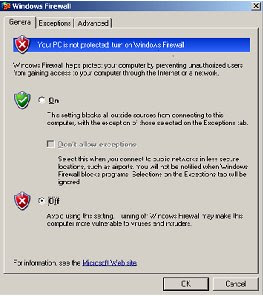
Now firewall is turnedoff
2.Right click the existing Dialup connection/Broadband connection
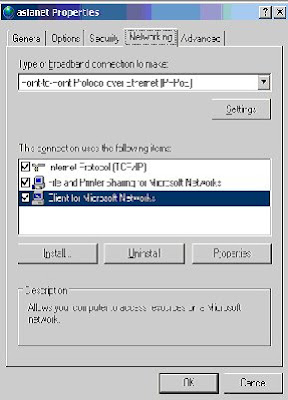
3.Take properties and click Networking TAB
Tick both
File and Print Sharing for Microsoft Networks
Client for Microsoft Networks
4.Click the Advanced TAB
5.Internet Connection Sharing
Tick must be provided in
{}Allow other network users to connect through this computers Internet
connection.
(when you click this a dialog box will come, just click OK)
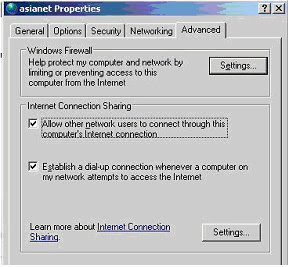
6.Now the ICS has been ENABLED
How to Configure the Windows Client
NOTE: Because there are several versions of Microsoft Windows,
the following steps may be different on your computer.
If they are, see your product documentation to complete these steps.
Log on as a member of the Administrators group to set up the Windows
clients that will share the Internet connection.
1. Click Start, click Control Panel, and then double-click Network Connections.
2. Right-click Local Area Connection, and then click Properties.
3. Click the General tab, and then verify that Client for Microsoft Networks
and Internet Protocol (TCP/IP) are displayed and selected.
4. Click Internet Protocol (TCP/IP), and then click Properties.
5. Click the General tab, click Obtain an IP address automatically, and
then click Obtain DNS server address automatically (if these options are not
already selected).
6. Click Advanced, and then make sure that the various lists on the IP Settings,
DNS, and WINS tabs are all empty.
Note that ICS provides these settings.
7. Click OK
Now client machine can access Internet
A)Right click the Local Area Connection and take Properties

B)Click the Advanced TAB
(Windows Firewall) Settings(click this tab)
Off(select this radio button)

Now firewall is turnedoff
2.Right click the existing Dialup connection/Broadband connection
3.Take properties and click Networking TAB
Tick both
File and Print Sharing for Microsoft Networks
Client for Microsoft Networks

4.Click the Advanced TAB
5.Internet Connection Sharing
Tick must be provided in
{}Allow other network users to connect through this computers Internet
connection.
(when you click this a dialog box will come, just click OK)

6.Now the ICS has been ENABLED
How to Configure the Windows Client
NOTE: Because there are several versions of Microsoft Windows,
the following steps may be different on your computer.
If they are, see your product documentation to complete these steps.
Log on as a member of the Administrators group to set up the Windows
clients that will share the Internet connection.
1. Click Start, click Control Panel, and then double-click Network Connections.
2. Right-click Local Area Connection, and then click Properties.
3. Click the General tab, and then verify that Client for Microsoft Networks
and Internet Protocol (TCP/IP) are displayed and selected.
4. Click Internet Protocol (TCP/IP), and then click Properties.
5. Click the General tab, click Obtain an IP address automatically, and
then click Obtain DNS server address automatically (if these options are not
already selected).
6. Click Advanced, and then make sure that the various lists on the IP Settings,
DNS, and WINS tabs are all empty.
Note that ICS provides these settings.
7. Click OK
Now client machine can access Internet
Tuesday, March 11, 2008
MICROSOFT EXCHANGE SERVER 2003
What is Exchange Server?
Exchange Server is a message collaborating software .It is used for configuring a windows machine as a MAIL SERVER . The main function of an exchange server is storing and sending mails between machines .
Supporting Clients For Exchange Server.
Outlook Express,MS Outlook,Outlook WebAccess.
InternetExplorer is used for accessing mails while using web accessing method.
How to Install Exchange Server 2003?
Before Installing Exchange, you must install the following Services
1.ASP.NET
2.IIS
3NNTP(Net News Transfer Protocol)
4.SMTP(Simple Mail Transfer Protocol)
5.WWW
Insert Exchange cd into Drive.
>cmd
>DRIVE(G:)>Setup\i386>setup /forestprep
> G>setup\i386>setup /domainprep
> G>setup\i386>setup
After completing Installation you can open Exchsrvr.through web access .
When accessing through browser ,you must provide a username and password to sign in your mail.
Monday, March 10, 2008
Time Synchronization :Client for Windows
NetTime is a simple time synchronization client for Windows 95/98/NT/2000
How to use NetTime?
In CMD prompt
>net time /set \\ipaddress (ipaddress of the other computer having exact time).After giving this the computer Name will be synchronized.
How to use NetTime?
In CMD prompt
>net time /set \\ipaddress (ipaddress of the other computer having exact time).After giving this the computer Name will be synchronized.
Saturday, March 8, 2008
How to Promote an Additional Domain Controller to a Primary Domain Controller ,in case existing PDC is down
In Additional Domain Controller(ADC)
Firstly you have to Transfer Five Server Roles.
1.Schema (ADS,Objects)
2.RID Master
3.Infrastructure Master
4.PDC
5.Domain Naming Master.
In cmd prompt
>ntdsutil
>ntdsutil>roles
fsmo master>connections
Server connections>connect to domain "DOMAIN NAME"
>Quit
Fsmo maintanance> seize schema master
>seize domain naming master
>seize rid master
>seize pdc
>seize infrastructure master
>quit
>ntdsutil>quit
exit
Now your ADC promoted to PDC
How to upgrade win2000 Domain controller to 2003 Domain
Answer:
First upgrade ADC Version.
In 2000server machine ,
1. Insert 2003 cd into Drive then take cmd promt.
2. I386>adprep /forestprep -------------------------runs forest upgradation.
3.I386>adprep /domainprep -------------------------runs Domain upgradation.
4.Then you can safely upgrade 2003 Server.
First upgrade ADC Version.
In 2000server machine ,
1. Insert 2003 cd into Drive then take cmd promt.
2. I386>adprep /forestprep -------------------------runs forest upgradation.
3.I386>adprep /domainprep -------------------------runs Domain upgradation.
4.Then you can safely upgrade 2003 Server.
Subscribe to:
Posts (Atom)