
Friday, June 13, 2008
Thursday, April 24, 2008
Install and Configure DNS in Server 2008
Installation
You can install a DNS server from the Control Panel or when promoting a member server to a domain controller (DC) (Figure A). During the promotion, if a DNS server is not found, you will have the option of installing it.
Figure A


.jpeg)
.jpeg)
.jpeg)
.jpeg)
.jpeg)

You can install a DNS server from the Control Panel or when promoting a member server to a domain controller (DC) (Figure A). During the promotion, if a DNS server is not found, you will have the option of installing it.
Figure A

Domain controller
To install a DNS server from the Control Panel, follow these steps:
From the Start menu, select Control Panel Administrative Tools Server Manager.
Expand and click Roles (Figure B).
Choose Add Roles and follow the wizard by selecting the DNS role (FigureC).
Click Install to install DNS in Windows Server 2008 (Figure D). Figure B

Expand and click Roles
Figure C
Figure C

DNS role
Figure D

Install DNS
DNS console and configuration
After installing DNS, you can find the DNS console from Start All Programs Administrative Tools DNS. Windows 2008 provides a wizard to help configure DNS.
When configuring your DNS server, you must be familiar with the following concepts:
Forward lookup zone
Reverse lookup zone
Zone types
After installing DNS, you can find the DNS console from Start All Programs Administrative Tools DNS. Windows 2008 provides a wizard to help configure DNS.
When configuring your DNS server, you must be familiar with the following concepts:
Forward lookup zone
Reverse lookup zone
Zone types
A forward lookup zone is simply a way to resolve host names to IP addresses. A reverse lookup zone allows a DNS server to discover the DNS name of the host. Basically, it is the exact opposite of a forward lookup zone. A reverse lookup zone is not required, but it is easy to configure and will allow for your Windows Server 2008 Server to have full DNS functionality.
When selecting a DNS zone type, you have the following options: Active Directory (AD) Integrated, Standard Primary, and Standard Secondary. AD Integrated stores the database information in AD and allows for secure updates to the database file. This option will appear only if AD is configured. If it is configured and you select this option, AD will store and replicate your zone files.
A Standard Primary zone stores the database in a text file. This text file can be shared with other DNS servers that store their information in a text file. Finally, a Standard Secondary zone simply creates a copy of the existing database from another DNS server. This is primarily used for load
To open the DNS server configuration tool:
Select DNS from the Administrative Tools folder to open the DNS console.
Highlight your computer name and choose Action Configure a DNS Server… to launch the Configure DNS Server Wizard.
Click Next and choose to configure the following: forward lookup zone, forward and reverse lookup zone, root hints only (Figure E).
Click Next and then click Yes to create a forward lookup zone (Figure F).
Select the appropriate radio button to install the desired Zone Type (Figure G).
Click Next and type the name of the zone you are creating.
Click Next and then click Yes to create a reverse lookup zone.
Repeat Step 5.
Choose whether you want an IPv4 or IPv6 Reverse Lookup Zone (Figure H).
Click Next and enter the information to identify the reverse lookup zone (Figure I).
You can choose to create a new file or use an existing DNS file (Figure J).
On the Dynamic Update window, specify how DNS accepts secure, nonsecure, or no dynamic updates.
If you need to apply a DNS forwarder, you can apply it on the Forwarders window. (Figure K).
Click Finish (Figure L).
Figure E

Configure
Figure F
Figure F
.jpeg)
Forward lookup zone
Figure G
.jpeg)
IPv4 or IPv6
Figure I
Figure G
.jpeg)
IPv4 or IPv6
Figure I
.jpeg)
Reverse lookup zone
Figure J
Figure J
.jpeg)
Choose new or existing DNS file
Figure K
Figure K
.jpeg)
Forwarders window
Figure L
Figure L
.jpeg)
Finish
Managing DNS records
You have now installed and configured your first DNS server, and you’re ready to add records to the zone(s) you created. There are various types of DNS records available. Many of them you will never use. We’ll be looking at these commonly used DNS records:
Start of Authority (SOA)
Name Servers
Host (A)
Pointer (PTR)
Canonical Name (CNAME) or Alias
Mail Exchange (MX)
Start of Authority (SOA) record
The Start of Authority (SOA) resource record is always first in any standard zone. The Start of Authority (SOA) tab allows you to make any adjustments necessary. You can change the primary server that holds the SOA record, and you can change the person responsible for managing the SOA. Finally, one of the most important features of Windows 2000 is that you can change your DNS server configuration without deleting your zones and having to re-create the wheel (Figure M).
Figure M

Change configuration
Name Servers
Name Servers specify all name servers for a particular domain. You set up all primary and secondary name servers through this record.
To create a Name Server, follow these steps:
Select DNS from the Administrative Tools folder to open the DNS console.
Expand the Forward Lookup Zone.
Right-click on the appropriate domain and choose Properties (Figure N).
Select the Name Servers tab and click Add.
Enter the appropriate FQDN Server name and IP address of the DNS server you want to add.
Figure N
.jpeg)


A Canonical Name (CNAME) or Alias record allows a DNS server to have multiple names for a single host. For example, an Alias record can have several records that point to a single server in your environment. This is a common approach if you have both your Web server and your mail server running on the same machine.
To create a DNS Alias:
Select DNS from the Administrative Tools folder to open the DNS console.
Expand the Forward Lookup Zone and highlight the folder representing your domain.
From the Action menu, select New Alias.
Enter your Alias Name (Figure Q).
Enter the fully qualified domain name (FQDN).
Click OK.


.jpeg)
Name Server
Host (A) records
A Host (A) record maps a host name to an IP address. These records help you easily identify another server in a forward lookup zone. Host records improve query performance in multiple-zone environments, and you can also create a Pointer (PTR) record at the same time. A PTR record resolves an IP address to a host name.
To create a Host record:
Select DNS from the Administrative Tools folder to open the DNS console.
Expand the Forward Lookup Zone and click on the folder representing your domain.
From the Action menu, select New Host.
Enter the Name and IP Address of the host you are creating (Figure O).
Select the Create Associated Pointer (PTR) Record check box if you want to create the PTR record at the same time. Otherwise, you can create it later.
Click the Add Host button.
Figure O

A Host (A) record
Pointer (PTR) records
A Pointer (PTR) record creates the appropriate entry in the reverse lookup zone for reverse queries. As you saw in Figure H, you have the option of creating a PTR record when creating a Host record. If you did not choose to create your PTR record at that time, you can do it at any point.
To create a PTR record:
Select DNS from the Administrative Tools folder to open the DNS console.
Choose the reverse lookup zone where you want your PTR record created.
From the Action menu, select New Pointer (Figure P).
Enter the Host IP Number and Host Name.
Click OK.
Figure P

New PointerCanonical Name (CNAME) or Alias record.
A Canonical Name (CNAME) or Alias record allows a DNS server to have multiple names for a single host. For example, an Alias record can have several records that point to a single server in your environment. This is a common approach if you have both your Web server and your mail server running on the same machine.
To create a DNS Alias:
Select DNS from the Administrative Tools folder to open the DNS console.
Expand the Forward Lookup Zone and highlight the folder representing your domain.
From the Action menu, select New Alias.
Enter your Alias Name (Figure Q).
Enter the fully qualified domain name (FQDN).
Click OK.

Alias Name
Mail Exchange (MX) records
Mail Exchange records help you identify mail servers within a zone in your DNS database. With this feature, you can prioritize which mail servers will receive the highest priority. Creating MX records will help you keep track of the location of all of your mail servers.
To create a Mail Exchange (MX) record:
Select DNS from the Administrative Tools folder to open the DNS console.
Expand the Forward Lookup Zone and highlight the folder representing your domain.
From the Action menu, select New Mail Exchanger.
Enter the Host Or Domain (Figure R).
Enter the Mail Server and Mail Server Priority.
Click OK.
Figure R

Host or Domain
Other new records
You can create many other types of records. For a complete description, choose Action Other New Records from the DNS console (Figure S). Select the record of your choice and view the description.
Figure S
Other new records
You can create many other types of records. For a complete description, choose Action Other New Records from the DNS console (Figure S). Select the record of your choice and view the description.
Figure S

Create records from the DNS console
Troubleshooting DNS servers
When troubleshooting DNS servers, the nslookup utility will become your best friend. This utility is easy to use and very versatile. It’s a command-line utility that is included within Windows 2008. With nslookup, you can perform query testing of your DNS servers. This information is useful in troubleshooting name resolution problems and debugging other server-related problems. You can access nslookup (Figure T) right from the DNS console
When troubleshooting DNS servers, the nslookup utility will become your best friend. This utility is easy to use and very versatile. It’s a command-line utility that is included within Windows 2008. With nslookup, you can perform query testing of your DNS servers. This information is useful in troubleshooting name resolution problems and debugging other server-related problems. You can access nslookup (Figure T) right from the DNS console

Nslookup utility
Monday, April 7, 2008
SERVER 2008 -FEATURES
10 Features in Windows Server 2008
1. Virtualization
Although it will not be available with the initial launch of Server 2008, Microsoft's Hyper-V hypervisor- based virtualization technology promises to be a star attraction of Server 2008 for many organisations.
(In virtualization technology, hyper visor is a software program that manages multiple Operating Systems (or multiple instances of the same operating system) on a single Computer system. The hypervisor manages the system's processor, memory, and other resources to allocate what each operating system requires. Hypervisors are designed for a particular processor architecture and may also be called virtualization managers.)
Although some 75 percent of large businesses have started using virtualization, only an estimated 10 percent of servers out are running virtual machines. This means the market is still immature. For Windows shops, virtualization using Server 2008 will be a relatively low-cost and low-risk way to dip a toe in the water.
At the moment, Hyper-V lacks the virtualized infrastructure support virtualization market leader VMware can provide. Roy Illsley, senior research analyst at U.K.-based Butler Group, noted that Microsoft is not as far behind as many people seem to think, however. "Don't forget Microsoft's System Center, which is a fully integrated management suite and which includes VM Manager. Obviously it only works in a Wintel environment, but if you have Server 2008 and System Center, you have a pretty compelling proposition.
"What Microsoft is doing by embedding virtualization technology in Server 2008 is a bit like embedding Internet Explorer into Windows," said Illsley. "This is an obvious attempt to get a foothold into the virtualization market."
At launch, Microsoft is unlikely to have a similar product to VMware's highly popular VMotion (which enables administrators to move virtual machines from one physical server to another while they are running), but such a product is bound to available soon after.
2. Server Core
Many server administrators, especially those used to working in a Linux environment, instinctively dislike having to install a large, feature-packed operating system to run a particular specialized server. Server 2008 offers a Server Core installation, which provides the minimum installation required to carry out a specific server role, such as for a DHCP, DNS or print server. From a security standpoint, this is attractive. Fewer applications and services on the sever make for a smaller attack surface. In theory, there should also be less maintenance and management with fewer patches to install, and the whole server could take up as little as 3Gb of disk space according to Microsoft. This comes at a price — there's no upgrade path back to a "normal" version of Server 2008 short of a reinstall. In fact there is no GUI at all — everything is done from the command line.
3. IIS
IIS7, the Web server bundled with Server 2008, is a big upgrade from the previous version. "There are significant changes in terms of security and the overall implementation which make this version very attractive," said Barb Goldworm, president and chief analyst at Boulder, Colorado-based Focus Consulting. One new feature getting a lot of attention is the ability to delegate administration of servers (and sites) to site admins while restricting their privileges.
4. Role-based installation
Role-based installation is a less extreme version of Server Core. Although it was included in 2003, it is far more comprehensive in this version. The concept is that rather than configuring a full server install for a particular role by uninstalling unnecessary components (and installing needed extras), you simply specify the role the server is to play, and Windows will install what's necessary — nothing more. This makes it easy for anyone to provision a particular server without increasing the attack surface by including unwanted components that will not do anything except present a security risk.
5. Read Only Domain Controllers (RODC)
It's hardly news that branch offices often lack skilled IT staff to administer their servers, but they also face another, less talked about problem. While corporate data centers are often physically secured, servers at branch offices rarely have the same physical security protecting them. This makes them a convenient launch pad for attacks back to the main corporate servers. RODC provides a way to make an Active Directory database read-only. Thus, any mischief carried out at the branch office cannot propagate its way back to poison the Active Directory system as a whole. It also reduces traffic on WAN links.
6. Enhanced terminal services
Terminal services has been beefed up in Server 2008 in a number of ways. TS RemoteApp enables remote users to access a centralized application (rather than an entire desktop) that appears to be running on the local computer's hard drive. These apps can be accessed via a Web portal or directly by double-clicking on a correctly configured icon on the local machine. TS Gateway secures sessions, which are then tunnelled over https, so users don't need to use a VPN to use RemoteApps securely over the Internet. Local printing has also been made significantly easier.
7. Network Access Protection
Microsoft's system for ensuring that clients connecting to Server 2008 are patched, running a firewall and in compliance with corporate security policies — and that those that are not can be remediated — is useful. However, similar functionality has been and remains available from third parties.
8. Bitlocker
System drive encryption can be a sensible security measure for servers located in remote branch offices or anywhere where the physical security of the server is sub-optimal. Bitlocker encryption protects data if the server is physically removed or booted from removable media into a different operating system that might otherwise give an intruder access to data which is protected in a Windows environment. Again, similar functionality is available from third-party vendors.
9. Windows PowerShell
Microsoft's new(ish) command line shell and scripting language has proved popular with some server administrators, especially those used to working in Linux environments. Included in Server 2008, PowerShell can make some jobs quicker and easier to perform than going through the GUI. Although it might seem like a step backward in terms of user friendly operation, it's one of those features that once you've gotten used to it, you'll never want to give up.
10. Better security
We've already mentioned various security features built into Server 2008, such as the ability to reduce attack surfaces by running minimal installations, and specific features like BitLocker and NAP. Numerous other little touches make Server 2008 more secure than its predecessors. An example is Address Space Load Randomization — a feature also present in Vista — which makes it more difficult for attackers to carry out buffer overflow attacks on a system by changing the location of various system services each time a system is run. Since many attacks rely on the ability to call particular services by jumping to particular locations, address space randomization can make these attacks much less likely to succeed.
Saturday, March 15, 2008
Domain Name System (DNS)
To access Internet resources by user-friendly domain names rather than these IP addresses, users need a system that translates these domain names to IP addresses and back. This translation is the primary task of an engine called the Domain Name System (DNS).
The two primary software components of DNS are the name server and the resolver.The primary functions of the name server are to host the database (called the zone file) containing domain information and to provide responses to name resolution queries through authoritative responses or referrals.The primary function of the resolver software is to formulate a name resolution query or series of queries.
The primary DNS data is the zone file.The zone file contains information about various resources in that zone. The information about each resource is represented in a record called a resource record (RR). Because a zone may contain several domains and several types of resources within each domain, the format of each RR contains fields for making this identification.
Installing and Configuring DNS
The Active Directory Installation wizard offers to install DNS.
(Keep in mind that the Active Directory Installation wizard does not install a reverse lookup zone).
HOW TO CONFIGURE DNS FOR ACTIVE DIRECTORY
1. Click Start --> Settings --> Control Panel.
2. Double-click Add/Remove Programs and then click Add/Remove Windows Components.
3. In Components, select Networking Services and then click Details.
4. In Subcomponents of Networking Services, select the Domain Name System (DNS) check box, click OK, and then click Next.
5. In Copy Files From, type the full path to the Windows 2000 distribution files and then click OK.
To host Active Directory, you must configure DNS with a zone for the Active Directory namespace. You should create both zone types for a proper DNS implementation that is, a forward lookup zone and a reverse lookup zone. Read on to discover how.
Creating a forward lookup zone
To create a forward lookup zone:
1. Click Start --> Programs --> Administrative Tools --> DNS.
Windows 2000 launches the DNS Microsoft Management Console, from which you can perform your DNS administration.
2. Expand the DNS server.
3. Right-click the Forward Lookup Zone folder and choose New Zone.
4. Click Next to continue when the New Zone wizard appears.
The wizard takes the pain out of DNS administration.
5. Ensure that Standard Primary is selected and click Next.
6. Ensure that Forward Lookup Zone is selected and click Next.
7. At the New Zone page, type the name of your zone (for example, fordummies.com) and click Next.
8. Select Create a New File With This File Name and click Next.
9. Click Finish.
Creating a reverse lookup zone
To create a reverse lookup zone:
1. Click Start --> Programs --> Administrative Tools --> DNS.
2. Expand the DNS server.
3. Right-click your server and choose New Zone.
4. Click Next to continue when the New Zone wizard appears.
5. Ensure that Standard Primary is selected and click Next.
6. Ensure that Reverse Lookup Zone is selected and click Next.
7. Ensure that Network ID is selected, type your network ID in the Network ID field, and click Next.
8. Select Create a New File With This File Name and click Next.
9. Click Finish.
As far as Active Directory is concerned, your DNS server is almost ready
How to configure ICS(Internet Connection Sharing) in server 2003?
1.First you must turrnoff Firewall(for that you must do the folowing steps)
A)Right click the Local Area Connection and take Properties
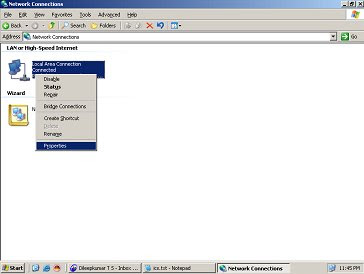
B)Click the Advanced TAB
(Windows Firewall) Settings(click this tab)
Off(select this radio button)
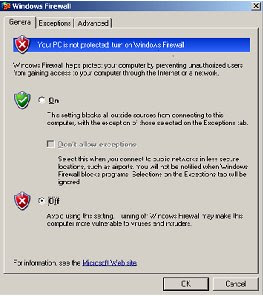
Now firewall is turnedoff
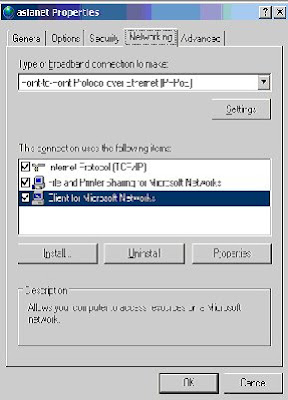
2.Right click the existing Dialup connection/Broadband connection
3.Take properties and click Networking TAB
Tick both
File and Print Sharing for Microsoft Networks
Client for Microsoft Networks
4.Click the Advanced TAB
5.Internet Connection Sharing
Tick must be provided in
{}Allow other network users to connect through this computers Internet
connection.
(when you click this a dialog box will come, just click OK)
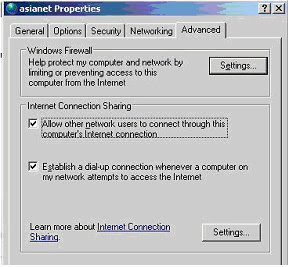
6.Now the ICS has been ENABLED
How to Configure the Windows Client
NOTE: Because there are several versions of Microsoft Windows,
the following steps may be different on your computer.
If they are, see your product documentation to complete these steps.
Log on as a member of the Administrators group to set up the Windows
clients that will share the Internet connection.
1. Click Start, click Control Panel, and then double-click Network Connections.
2. Right-click Local Area Connection, and then click Properties.
3. Click the General tab, and then verify that Client for Microsoft Networks
and Internet Protocol (TCP/IP) are displayed and selected.
4. Click Internet Protocol (TCP/IP), and then click Properties.
5. Click the General tab, click Obtain an IP address automatically, and
then click Obtain DNS server address automatically (if these options are not
already selected).
6. Click Advanced, and then make sure that the various lists on the IP Settings,
DNS, and WINS tabs are all empty.
Note that ICS provides these settings.
7. Click OK
Now client machine can access Internet
A)Right click the Local Area Connection and take Properties

B)Click the Advanced TAB
(Windows Firewall) Settings(click this tab)
Off(select this radio button)

Now firewall is turnedoff
2.Right click the existing Dialup connection/Broadband connection
3.Take properties and click Networking TAB
Tick both
File and Print Sharing for Microsoft Networks
Client for Microsoft Networks

4.Click the Advanced TAB
5.Internet Connection Sharing
Tick must be provided in
{}Allow other network users to connect through this computers Internet
connection.
(when you click this a dialog box will come, just click OK)

6.Now the ICS has been ENABLED
How to Configure the Windows Client
NOTE: Because there are several versions of Microsoft Windows,
the following steps may be different on your computer.
If they are, see your product documentation to complete these steps.
Log on as a member of the Administrators group to set up the Windows
clients that will share the Internet connection.
1. Click Start, click Control Panel, and then double-click Network Connections.
2. Right-click Local Area Connection, and then click Properties.
3. Click the General tab, and then verify that Client for Microsoft Networks
and Internet Protocol (TCP/IP) are displayed and selected.
4. Click Internet Protocol (TCP/IP), and then click Properties.
5. Click the General tab, click Obtain an IP address automatically, and
then click Obtain DNS server address automatically (if these options are not
already selected).
6. Click Advanced, and then make sure that the various lists on the IP Settings,
DNS, and WINS tabs are all empty.
Note that ICS provides these settings.
7. Click OK
Now client machine can access Internet
Tuesday, March 11, 2008
MICROSOFT EXCHANGE SERVER 2003
What is Exchange Server?
Exchange Server is a message collaborating software .It is used for configuring a windows machine as a MAIL SERVER . The main function of an exchange server is storing and sending mails between machines .
Supporting Clients For Exchange Server.
Outlook Express,MS Outlook,Outlook WebAccess.
InternetExplorer is used for accessing mails while using web accessing method.
How to Install Exchange Server 2003?
Before Installing Exchange, you must install the following Services
1.ASP.NET
2.IIS
3NNTP(Net News Transfer Protocol)
4.SMTP(Simple Mail Transfer Protocol)
5.WWW
Insert Exchange cd into Drive.
>cmd
>DRIVE(G:)>Setup\i386>setup /forestprep
> G>setup\i386>setup /domainprep
> G>setup\i386>setup
After completing Installation you can open Exchsrvr.through web access .
When accessing through browser ,you must provide a username and password to sign in your mail.
Monday, March 10, 2008
Time Synchronization :Client for Windows
NetTime is a simple time synchronization client for Windows 95/98/NT/2000
How to use NetTime?
In CMD prompt
>net time /set \\ipaddress (ipaddress of the other computer having exact time).After giving this the computer Name will be synchronized.
How to use NetTime?
In CMD prompt
>net time /set \\ipaddress (ipaddress of the other computer having exact time).After giving this the computer Name will be synchronized.
Saturday, March 8, 2008
How to Promote an Additional Domain Controller to a Primary Domain Controller ,in case existing PDC is down
In Additional Domain Controller(ADC)
Firstly you have to Transfer Five Server Roles.
1.Schema (ADS,Objects)
2.RID Master
3.Infrastructure Master
4.PDC
5.Domain Naming Master.
In cmd prompt
>ntdsutil
>ntdsutil>roles
fsmo master>connections
Server connections>connect to domain "DOMAIN NAME"
>Quit
Fsmo maintanance> seize schema master
>seize domain naming master
>seize rid master
>seize pdc
>seize infrastructure master
>quit
>ntdsutil>quit
exit
Now your ADC promoted to PDC
How to upgrade win2000 Domain controller to 2003 Domain
Answer:
First upgrade ADC Version.
In 2000server machine ,
1. Insert 2003 cd into Drive then take cmd promt.
2. I386>adprep /forestprep -------------------------runs forest upgradation.
3.I386>adprep /domainprep -------------------------runs Domain upgradation.
4.Then you can safely upgrade 2003 Server.
First upgrade ADC Version.
In 2000server machine ,
1. Insert 2003 cd into Drive then take cmd promt.
2. I386>adprep /forestprep -------------------------runs forest upgradation.
3.I386>adprep /domainprep -------------------------runs Domain upgradation.
4.Then you can safely upgrade 2003 Server.
Subscribe to:
Posts (Atom)