
Thursday, March 28, 2013


Wednesday, March 6, 2013
Upgrading an Active Directory Domain from Windows Server 2008 or Windows Server 2008 R2 to Windows Server 2012
Upgrading an Active Directory Domain from Windows Server 2008 or Windows Server 2008 R2 to Windows Server 2012
!!!NEVER START BEFORE HAVING CREATED AND TESTED A BACKUP OF YOUR DOMAIN/DATA/MACHINE!!!
A new OS Domain Controller installation should always start with use from the support tools to check the Domain and Domain Controllers for errors that must be resolved before. The following command line tools and programs will help you to verify if some problems exist within your Domain and the Domain Controllers.
Dcdiag /v /c /d /e /s:DCName >c:\dcdiag.log [please replace DCName with your Domain Controller name]
Repadmin /showrepl dc* /verbose /all /intersite >c:\repl.log ["dc* is a place holder for the starting name of the DCs if they all begin the same (if more than one DC exists)]
Dnslint /ad /s "DCipaddress" [use http://support.microsoft.com/kb/321045 for download and instructions]
ADREPLSTATUS: http://www.microsoft.com/en-us/download/details.aspx?id=30005
--------------------------------------------
On the old server open DNS management console and check that you are running Active directory integrated zones, which is recommended also from Microsoft.
--------------------------------------------
The Schema must be updated for the new OS Domain Controller, so even if the update is done automatically you may check it before. Therefore you can use the following command:
"Dsquery * cn=schema,cn=configuration,dc=domain,dc=local -scope base -attr objectVersion" without the quotes in a command prompt [please replace “dc=domain,dc=local” with your Domain Name]. The output number is the Schema objectVersion:
13 = Windows 2000 Server
30 = Windows Server 2003
31 = Windows Server 2003 R2
44 = Windows Server 2008
47 = Windows Server 2008 R2
56 = Windows Server 2012
--------------------------------------------
If the first installed Domain Controller in the domain should be removed or replaced with another one, doesn’t matter if new or same OS version, assure that you export the recovery agents EFS certificate private key from the Domain Controller BEFORE you demote/retire it. Details on how to do this are listed in (http://support.microsoft.com/kb/241201) and (http://technet.microsoft.com/en-us/library/cc755157(WS.10).aspx). If you don’t save it, you will not be able to encrypt data in case of problems.
--------------------------------------------
I recommend installing the new machine as a member server in your existing domain before promoting to Domain Controller. Configure a fixed ip address and set the preferred DNS server to one existing DC/DNS server only. Do not change anything with IPv6, as also recommended from Microsoft in http://technet.microsoft.com/en-us/magazine/2009.07.cableguy.aspx
Do NOT use the new server as DNS server on the NIC until all DNS information is replicated from one existing DC/DNS. If you do it with other DNS servers on the NIC I often have seen that the SYSVOL and NETLOGON shares are not correct created.
--------------------------------------------
As this article applies in most steps to Windows Server 2008 32bit/64bit and Windows Server 2008 R2, I’ll start with the difference on Windows Server 2008 32bit preparation.
To install a new OS Domain Controller adprep is required and located in the Windows server 2012 installation disk …\support\adprep folder. Here you can also find the schema files. You will realize that there is ONLY adprep.exe and not adprep32.exe anymore. This belongs to the reason that adprep process on earlier OS domains is done automatically during promotion to DC.
If you run adprep.exe on the 32bit OS Domain Controller you will see an error message:

So on Windows Server 2008 32bit you have to prepare the forest/domain with the new way remote from Windows Server 2012.
With the 64bit version from adprep you can still work on Windows Server 2008 64bit and Windows Server 2008 R2 DCs for the Schema update.

So both options are possible, from the command line on Windows Server 2008 R2 or during promotion process from the Windows Server 2012.
--------------------------------------------
The minimum functional level must be at least Windows Server 2003, so NO lower functional levels are allowed anymore.
Please control that the Domain functional level is set to Windows Server 2003, in AD Domains and Trusts right click the "Domain Name".

Also control that the Forest functional level is set to Windows Server 2003, in AD Domains and Trusts right click “Active Directory Domains and Trusts”.

--------------------------------------------
If you run as known before DCPROMO on a new Windows Server 2012 you will get an error message as this is not longer the way to promote a DC. Now the promotion to Domain Controller is done via Server Manager.

--------------------------------------------
In this article I will focus on the new remote way with using the Windows Server 2012, as this is much more error free and comfortable to use.
Assure to use an account that is member of the Enterprise Admins and install the new Windows Server 2012 as Domain Member Server if not done already. Now start the Server Manager and choose “Add roles and features”, in “Before you begin” click next, in the “Installation Type” use “Role-based or feature-based installation” and click Next.

Choose the required Server and click Next

Now check the Active Directory Domain Services and in the upcoming window click the “Add features” button.

Choose Next and add additional features if required.

Click Next.

Click Next and then choose Install.


It may take some time, depending on the hardware.

If the installation is done be aware of the “Promote this server to a domain controller” option in the result pane

Again a new window opens to configure the DC with all requirements

Here choose Select and provide the domain credentials or use the already shown account. If you have the need using a smart card, then the server MUST be joined to the domain BEFORE.

Select the domain from the list and click OK.

Click Next.

The Domain controller Options appear and here choose DNS and GC and fill in the DSRM Restore mode password. Then choose Next.

In this step the DNS delegation warning can be ignored, as the Domain Controller is for the already existing domain.

Choose Next and either use the default or select a preferred DC to replicate from. Even IFM (Install from media) is possible at this step.

Do NOT store the Active Directory database, log files, or SYSVOL on a data volume formatted with Resilient File System (ReFS), this is new with Windows Server 2012. Database, Log file and SYSVOL folder paths must be stored on NTFS data volumes in this window and then choose Next.

Information about forest, schema and domain update is shown where you also choose Next.

Review your settings, even possible to export as Windows PowerShell script for future use and click Next.

Prerequisite checks will be done.

Review the Check and click Install.


Results are listed/shown


The server automatically reboots after installation/promotion.
--------------------------------------------
After adding a Windows Server 2012 Domain Controller to an existing domain you should also transfer the FSMO roles to the newest Domain Controller
In this case 6 new security groups are created in the BUILTIN container in AD UC:
- Access Control Assistance Operators
- Hyper-V Administrators
- RDS Endpoint Servers
- RDS Management Servers
- RDS Remote Access Servers
- Remote Management Users
And 1 new security group in the Users container in AD UC:
- Cloneable Domain Controllers
--------------------------------------------
You can see in the event viewer (Directory service log) that the FSMO roles are transferred, EVENT ID 1458 with the source ActiveDirectory_DomainService for each FSMO role.
--------------------------------------------
After the transfer from the PDCEmulator FSMO it is required to reconfigure the time service on the old and new PDCEmulator, so a recommended external time source is used:
"w32tm /config /manualpeerlist:PEERS /syncfromflags:manual /reliable:yes /update”
where PEERS will be filled with the ip address or server (time.windows.com) and on the OLD PDCEmulator run:
"w32tm /config /syncfromflags:domhier /reliable:no /update”
and stop/start the time service on the old one. All commands run in an elevated command prompt without the quotes.
--------------------------------------------
If not done on earlier OS version upgrades run ONLY the adprep /domainprep /gpprep, to enable the RSOP planning mode, manual as this is NOT involved in the automated process.
--------------------------------------------
Reconfigure the DNS configuration on your NIC of the Windows Server 2012 machine, preferred DNS itself, secondary another Domain DNS server and as recommended from DNS BPA the loopback ip address (127.0.0.1) as 3rd entry.
--------------------------------------------
Windows 8 Keyboard Shortcut-
There are some many Windows 8 Keyboard Shortcuts.
1. Windows Key + C: Brings up Charms menu
2. Windows Key + X: Brings up a menu of advanced system options
3. Windows Key + I: Brings up the settings menu for current application
4. Windows Key + Q: Brings up the apps search menu
5. Windows Key + D: Brings up desktop mode.
6. Windows Key + Tab: Brings up Task Switcher
7. Windows Key + H: Brings up Share menu for current application
8. Windows Key + M: Brings up desktop mode and minimizes all other windows.
9. Windows Key + W: Brings up universal search menu
10. Windows Key + F: Brings up universal search menu and allows you to search files
11. Windows Key + R: Brings up Run menu
12. Windows Key + E: Brings up File Explorer
13. Windows Key +Number Key (1-9): Brings up to desktop mode and allows you to make the nth application on the task bar active. N will be the number key you will hit.
14. Windows Key +. (Period key): Allow you to dock current Windows 8-style app left/ right
15. Windows Key + Z: Brings up app menu
1. Windows Key + C: Brings up Charms menu
2. Windows Key + X: Brings up a menu of advanced system options
3. Windows Key + I: Brings up the settings menu for current application
4. Windows Key + Q: Brings up the apps search menu
5. Windows Key + D: Brings up desktop mode.
6. Windows Key + Tab: Brings up Task Switcher
7. Windows Key + H: Brings up Share menu for current application
8. Windows Key + M: Brings up desktop mode and minimizes all other windows.
9. Windows Key + W: Brings up universal search menu
10. Windows Key + F: Brings up universal search menu and allows you to search files
11. Windows Key + R: Brings up Run menu
12. Windows Key + E: Brings up File Explorer
13. Windows Key +Number Key (1-9): Brings up to desktop mode and allows you to make the nth application on the task bar active. N will be the number key you will hit.
14. Windows Key +. (Period key): Allow you to dock current Windows 8-style app left/ right
15. Windows Key + Z: Brings up app menu
**********


Folder Lock Without Using Any Software :-Folder Security Hide and Lock
Folder Lock Without Using Any Software
Lock your personal Folder with out using any Software; Its Batch (*.bat ) File Trick
Exactly Copy paste it In Note pad and save it as a Batch File
| cls @ECHO OFF title Folder Locker if EXIST "Control Panel.{21EC2020-3AEA-1069-A2DD-08002B30309D}" goto UNLOCK if NOT EXIST Locker goto MDLOCKER :CONFIRM echo Are you sure u want to Lock the folder(Y/N) set/p "cho=>" if %cho%==Y goto LOCK if %cho%==y goto LOCK if %cho%==n goto END if %cho%==N goto END echo Invalid choice. goto CONFIRM :LOCK ren Locker "Control Panel.{21EC2020-3AEA-1069-A2DD-08002B30309D}" attrib +h +s "Control Panel.{21EC2020-3AEA-1069-A2DD-08002B30309D}" echo Folder locked goto End :UNLOCK echo Enter password to Unlock folder set/p "pass=;" if NOT %pass%== type your password here goto FAIL attrib -h -s "Control Panel.{21EC2020-3AEA-1069-A2DD-08002B30309D}" ren "Control Panel.{21EC2020-3AEA-1069-A2DD-08002B30309D}" Locker echo Folder Unlocked successfully goto End :FAIL echo Invalid password goto end :MDLOCKER md Locker echo Locker created successfully goto End :End |
- Exactly Copy paste it In Note pad and save it as a Batch File
Save as Locker.bat(Save as OPtion choose all files -filename.bat) - Double click on batch file you have created and you will see a new folder on your desktop or saved location called “Locker”
- Now add the files you want to be locked in that folder.
- Double click on batch file you have created again, and it will ask you if you want to hide the folders
- Type Y For Yes. The folder will be locked and hidden.
- To unhide, double click batch file you have created , type in your password and press enter…
Monday, March 4, 2013
How to Join Domain using djoin -Offline Mode
Join a Client PC to Domain -Offline Mode-
how to Join Domain using djoin -Offline
Windows Server 2008 R2 and Windows 7 introduce a new option for joining computers to a domain, called offline domain join.
As the name of the feature suggests, offline domain join allows you to join a server or client to the domain even if the computer does not
have network connectivity or cannot currently contact a domain controller.
have network connectivity or cannot currently contact a domain controller.
the syntax of djoin is
djoin.exe /provision /domain DomainDNSName /machine ComputerName /savefile Filename
On Domain Controller open a command prompt and type the following command
djoin.exe /provision /domain MYDOMAIN.COM /machine PC-1 /savefile test.txt

copy the saved file to client machine and run the following command in client machine (open command prompt as run as administrator)
djoin.exe /requestODJ /loadfile test.txt /windowspath %SystemRoot% /localos

where:
blob. This is the file that you created by using Djoin.exe /provision.
Windows is installed. Alternately, you can use the variable %WinDir%.
computer.
How to block some applications using group policy
How to block some applications using group policy(*.exe block)
Domain Controller Level Blocking
Start-- Run
Gpmc.msc
Expand User configuration
Click System
On right side open “Don’t run specified windows application”
Click “Enable” then add the specified applications

DoubleClick -Dont Run Specific Windows Apps--
 can Add any .exe files like portable ultrasuft some version is -u1210.exe so this will not work . like winword.exe/EXCEL.exe any...
Click System
On right side open “Don’t run specified windows application”
Click “Enable” then add the specified applications

DoubleClick -Dont Run Specific Windows Apps--

How to use GPO to Allow or Block Website or URL- Domain Controller Group Policy
we will be using Windows Server 2008 server, the procedure that you are about to read will be similar to Windows Server 2003 R2 and Windows Server 2012 GPOs.
Open up the Group Policy Management Editor
RUN--> GPMC.MSC
(Click on Start and typeGroup Policy Management in search program files box, click on the top item) and locate the Organizational Unit (OU), expand User Configuration, expand Windows Settings, expand Internet Explorer then click on Security and double click Security Zones and Content Ratings.

On Security and Privacy Settings properties, under Content Ratings select Import the current Content Ratings settings, then click on Modify Settings, click on OK to save.

On Content Advisor properties, click on Approved Sites tab, in Allow this website you may select Always, to Allow a website, click on OK to save.


or choose Never to block a website then click on OK to save.

Thursday, May 19, 2011
Installing and Configuring IAS- Internet Authentication Service
Installing and Configuring IAS
1.Click Start > Control Panel > Add Remove Programs, then click Add/Remove Windows Components.
2.Select Networking Services > Details from the dialog box in the Windows Components Wizard.
3.Select Internet Authentication Service followed by OK, then click Next.
Once IAS is installed, it is time to configure the properties for the IAS server as follows:
1.Click Start > Programs > Administrative Tools > Internet Authentication Service.
2.Right-click Internet Authentication Service and select Properties.
3.Select the Ports tab, and configure the RADIUS authentication and accounting UDP ports if they don't already show 1812 and 1645 for authentication, and 1813 and 1646 for accounting.
4.Continuing from Properties, on the General tab, select each required option for IAS event logging, then click OK.
5.Right-click RADIUS Clients and select New RADIUS Client.
6.From the New RADIUS Client Wizard add basic client information, then click Next.
7.Select RADIUS Standard from the Client-Vendor drop-down list on the New RADIUS Client screen and enter the shared secret password of your choice, then select Finish.
Next: Configuring Remote Access Policies
Configuring Remote Access Policies
We now want to configure the remote access policies. In this instance, we will grant access to a Windows Global Group called Radius-Clients as follows:
1.Create a Group called Radius-Clients. Click Start > Administrative Tools > Active Directory Users and Computers. Right-click the Users container and select New > Group. In the New Objec-Group box, type Radius-Clients in the Group Name text box, then click OK.
2.Create the policy condition and policy profile through the New Remote Access Policy Wizard. Click Start > Administrative Tools > Routing and Remote Access. Right-click Remote Access Policies in the left pane of the management console and select New Remote Access Policy to start the New Remote Access Policy Wizard, then click Next.
3.Select Set up a custom policy and enter Radius-Clients in the Policy Name box.
4.Click Next to move to the Policy Conditions screen. Click Add to specify Windows-Groups for the condition portion of the RRAS Policy.
5.Click Add to open the Groups selection box, then click Add again. From the Select Groups dialog box, type Dial into the text box and click the Check Names button. The Radius-Clients group should be displayed in the text box.
6.Click OK, then click OK again and click Next to view the Permissions screen. Select Grant remote access permission.
7.Click Next to proceed to the Profile screen. Click the Edit Profile button to invoke the Edit Dial-in Profile dialog box. Click the Multilink tab. We want to allow Multilink connections and we will drop the second line if the bandwidth requirement drops below 50 percent. Select Allow Multilink connections. Select Require BAP for dynamic Multilink requests and accept the defaults.
8.Click OK. Click Next and then click Finish to complete the Remote Access Policy configuration. Now, any users that belong to the Radius-Clients group will be granted dial-in access with multilink capabilities.
Configuring the IAS Server Properties
.com
1.Select Remote access logging from the left pane of the MMC.
2.From the right pane, right-click Local File or SQL Server, then select Properties.
3.From the Settings tab, select one or more check boxes for recording authentication and accounting requests in the IAS log files:
4.For accounting request and response captures, select Accounting requests.
5.For authentication requests, Access-Accept messages, and Access-Reject messages captures, select Authentication requests.
6.For periodic status update captures, select Periodic status.
7.Click OK to finish.
Registering the IAS Server
Now that we have a configuration nearly completed, we could copy the IAS configuration from the first IAS server to additional IAS servers, but in this instance we'll omit this stage and go on to we have to register the IAS server in the appropriate Active Directory domains. As noted earlier, there are there are three ways to accomplish this. We'll register the IAS server in the default domain using Active Directory Users and Computers:
1.Log on to the IAS server with an account that has administrative credentials for the domain.
2.Open Active Directory Users and Computers. Click Start > Programs > Administrative Tools > Active Directory Users and Computers.
3.In the left pane of the ADUC console, click the Users folder for your domain.
4.In the right pane, right-click RAS and IAS Servers, then click Properties.
5.In the RAS and IAS Servers Properties dialog box, on the Members tab, add the IAS server if it is not already present.
6.Click OK to finish.
You have now done everything you need to do for the Routing and Remote Access server to use the IAS server for authentication. By default, the IAS (RADIUS) server will use Windows authentication to determine if authentication is successful.
Configuring RRAS policies to Permit or Deny Access
A traditional LAN is normally located within a single building or site. The systems within the LAN are administered by a single individual or a group of individuals and policies exist for administration and configuration. However, if users connect from outwith the LAN, the systems they connect from may not be administered by the corporate administrator or administrators. This can cause configuration problems as well as security problems.
Remote access policies help administrators apply a consistent policy to machines that are not directly administered within the corporate LAN. Administrators can use remote access policies to limit the access rights and privileges of remote users and computers by validating connections and specifying connection restrictions. Connection settings that can be validated by standard remote access policy settings include:
•Authentication methods
•Group membership
•Remote access permission
•Time of day
•Type of connection
Advanced remote access policy validation settings include the following:
•Access server identity
•Access client phone number or MAC address
•Whether user account dial-in properties are ignored
•Whether unauthenticated access is allowed
Authentication methods include the following:
•PEAP
•EAP
•MS-CHAP v1 and v2
•CHAP
•PAP
•Unauthenticated access
Authentication Methods
Authentication method refers to the type of authentication being used by the client, eg: EAP, CHAP, MS-CHAP etc.).
Group membership is configured via Active Directory Users and Computers. Groups can significantly reduce the administrative workload by grouping users together according to job functions, access rights and requirements and other common similarities. Group membership policy restrictions can be used to allow corporate users to gain network access based on one set of criteria, while users from a specific vendor or partner might have a different set of remote access restrictions
Time of day restrictions ensure that users can only log in at certain times. This can be used to prevent users from connecting during maintenance operations or to keep remote users out of the network after normal business hours.
Type of connection validation sets different remote access policies based on the method the user uses to connect, eg: VPN users could have one policy, while analog dialup users are subject to a different policy.
Access server identity validation ensures that users connecting to a particular access server have a specific policy applied to them. This can be used to ensure that a user is connecting through proper channels, eg: if someone was to attempt to break into the network through a non-authorised connection, this restriction would block them.
Access client phone number validation ensures the user is connecting from an authorized location or computer. Using the client's Calling Station ID) for validation relies upon a certain amount of physical security as well as password or certificate-based electronic security. Someone would need to break into the calling location and use that phone to connect based on this validation.
Connection Restrictions
Once a remote access policy has authorised a connection, it can set connection restrictions based on the following:
•Encryption strength
•Idle timeout
•IP packet filters
•Maximum session time
Remote access policies can also apply advanced connection restrictions based on
the following:
•IP address for PPP connections
•Static routes
Encryption strength can range from 40-bit to 168-bit. Encryption property settings for Windows Server 2003 include:
•no encryption
•Basic encryption (40-bit MPPE or 56-bit DES)
•strong encryption (56-bit MPPE or 56-bit DES)
•strongest encryption (128-bit MPPE or 168-bit 3DES).
Idle timeout is used to secure the network by disconnecting users after a specific amount of idle time has elapsed.
IP packet filters restrict connections based on the services being requested, eg: Telnet access may be granted to a dial-in user by configuring an IP packet filter to allow traffic to TCP port 23 at a specified address.
Maximum session time ensures security by disconnecting a user after a specified
amount of time regardless of the current session status (idle or active).
Specific IP addresses may be distributed through PPP connections to restrict access to portions of the network, providing another method for securing network access through remote access policy.
Static routes also set network access restrictions by routing or not routing specific
traffic based on destination network address
Global Remote Access Policies
Global remote access policies may be varied according to the following:
•Access client phone number or MAC address
•Authentication methods
•Group membership
•Identity of the access server
•Time of day
•Type of connection
•Whether or not unauthenticated access is allowed
Windows Server 2003 remote access servers provide remote access policy through the
Routing and Remote Access Service on stand-alone machines. The RRAS policy applies to connections through that specific RRAS server. If you are using IAS or RADIUS on your network, remote access policies are configured through the IAS or RADIUS server.
Remote access policies determine what users or machines gain access, through what method, when, and what restrictions are put on them once they have access. By default, two policies are created. One controls access to the remote access server itself and the other controls access to network resources outside of the remote access server.
You can also create your own policies to control access by right-clicking on remote access policies and selecting New Remote Access Policy. You will then be asked if you want to use the wizard to guide you through policy creation or you can choose to create a custom policy.
If you use the wizard, it will guide you through the process of creating the new policy. You will be asked questions like what service this is for (VPN, Ethernet, dial-up, wireless, etc.), is it for a group or individual users, what authentication protocols are to be used, what encryption methods are to be used and other settings, based on the type of remote connection you are configuring.
If you choose to create a custom policy, you will be asked to select the user or group that the policy applies to, then you will be prompted to create Conditions which determine when the policy is applied. For example, a policy might apply only to the group, say HR-users and it could be configured to assign them a different default gateway.
Configuring a remote access policy for an RRAS server
1.Configure the user accounts to use remote access policy for dial-in access.
2.Click Start > Programs > Administrative Tools > Active Directory Users and Computers.
3.Verify that the user accounts have the Remote Access Permission (Dial-in or VPN) option set to Control access through Remote Access Policy.
4.Open the Routing and Remote Access management console to configure the policy, then click Start > Programs > Administrative Tools > Routing and Remote Access.
5.If necessary, double-click Routing and Remote Access and the server name.
6.In the left pane, right-click Remote Access Policies, then click New Remote Access Policy.
7.Select the appropriate policy settings as discussed above.
8.Delete the default policies.
|The logbook for this section should provide a record of the steps you have taken to configure remote access authentication protocols to provide authentication for remote access clients and configure remote access policies to permit or deny access. Completion of activities in this section should provide sufficient evidence for these tasks.|
1.Click Start > Control Panel > Add Remove Programs, then click Add/Remove Windows Components.
2.Select Networking Services > Details from the dialog box in the Windows Components Wizard.
3.Select Internet Authentication Service followed by OK, then click Next.
Once IAS is installed, it is time to configure the properties for the IAS server as follows:
1.Click Start > Programs > Administrative Tools > Internet Authentication Service.
2.Right-click Internet Authentication Service and select Properties.
3.Select the Ports tab, and configure the RADIUS authentication and accounting UDP ports if they don't already show 1812 and 1645 for authentication, and 1813 and 1646 for accounting.
4.Continuing from Properties, on the General tab, select each required option for IAS event logging, then click OK.
5.Right-click RADIUS Clients and select New RADIUS Client.
6.From the New RADIUS Client Wizard add basic client information, then click Next.
7.Select RADIUS Standard from the Client-Vendor drop-down list on the New RADIUS Client screen and enter the shared secret password of your choice, then select Finish.
Next: Configuring Remote Access Policies
Configuring Remote Access Policies
We now want to configure the remote access policies. In this instance, we will grant access to a Windows Global Group called Radius-Clients as follows:
1.Create a Group called Radius-Clients. Click Start > Administrative Tools > Active Directory Users and Computers. Right-click the Users container and select New > Group. In the New Objec-Group box, type Radius-Clients in the Group Name text box, then click OK.
2.Create the policy condition and policy profile through the New Remote Access Policy Wizard. Click Start > Administrative Tools > Routing and Remote Access. Right-click Remote Access Policies in the left pane of the management console and select New Remote Access Policy to start the New Remote Access Policy Wizard, then click Next.
3.Select Set up a custom policy and enter Radius-Clients in the Policy Name box.
4.Click Next to move to the Policy Conditions screen. Click Add to specify Windows-Groups for the condition portion of the RRAS Policy.
5.Click Add to open the Groups selection box, then click Add again. From the Select Groups dialog box, type Dial into the text box and click the Check Names button. The Radius-Clients group should be displayed in the text box.
6.Click OK, then click OK again and click Next to view the Permissions screen. Select Grant remote access permission.
7.Click Next to proceed to the Profile screen. Click the Edit Profile button to invoke the Edit Dial-in Profile dialog box. Click the Multilink tab. We want to allow Multilink connections and we will drop the second line if the bandwidth requirement drops below 50 percent. Select Allow Multilink connections. Select Require BAP for dynamic Multilink requests and accept the defaults.
8.Click OK. Click Next and then click Finish to complete the Remote Access Policy configuration. Now, any users that belong to the Radius-Clients group will be granted dial-in access with multilink capabilities.
Configuring the IAS Server Properties
.com
1.Select Remote access logging from the left pane of the MMC.
2.From the right pane, right-click Local File or SQL Server, then select Properties.
3.From the Settings tab, select one or more check boxes for recording authentication and accounting requests in the IAS log files:
4.For accounting request and response captures, select Accounting requests.
5.For authentication requests, Access-Accept messages, and Access-Reject messages captures, select Authentication requests.
6.For periodic status update captures, select Periodic status.
7.Click OK to finish.
Registering the IAS Server
Now that we have a configuration nearly completed, we could copy the IAS configuration from the first IAS server to additional IAS servers, but in this instance we'll omit this stage and go on to we have to register the IAS server in the appropriate Active Directory domains. As noted earlier, there are there are three ways to accomplish this. We'll register the IAS server in the default domain using Active Directory Users and Computers:
1.Log on to the IAS server with an account that has administrative credentials for the domain.
2.Open Active Directory Users and Computers. Click Start > Programs > Administrative Tools > Active Directory Users and Computers.
3.In the left pane of the ADUC console, click the Users folder for your domain.
4.In the right pane, right-click RAS and IAS Servers, then click Properties.
5.In the RAS and IAS Servers Properties dialog box, on the Members tab, add the IAS server if it is not already present.
6.Click OK to finish.
You have now done everything you need to do for the Routing and Remote Access server to use the IAS server for authentication. By default, the IAS (RADIUS) server will use Windows authentication to determine if authentication is successful.
Configuring RRAS policies to Permit or Deny Access
A traditional LAN is normally located within a single building or site. The systems within the LAN are administered by a single individual or a group of individuals and policies exist for administration and configuration. However, if users connect from outwith the LAN, the systems they connect from may not be administered by the corporate administrator or administrators. This can cause configuration problems as well as security problems.
Remote access policies help administrators apply a consistent policy to machines that are not directly administered within the corporate LAN. Administrators can use remote access policies to limit the access rights and privileges of remote users and computers by validating connections and specifying connection restrictions. Connection settings that can be validated by standard remote access policy settings include:
•Authentication methods
•Group membership
•Remote access permission
•Time of day
•Type of connection
Advanced remote access policy validation settings include the following:
•Access server identity
•Access client phone number or MAC address
•Whether user account dial-in properties are ignored
•Whether unauthenticated access is allowed
Authentication methods include the following:
•PEAP
•EAP
•MS-CHAP v1 and v2
•CHAP
•PAP
•Unauthenticated access
Authentication Methods
Authentication method refers to the type of authentication being used by the client, eg: EAP, CHAP, MS-CHAP etc.).
Group membership is configured via Active Directory Users and Computers. Groups can significantly reduce the administrative workload by grouping users together according to job functions, access rights and requirements and other common similarities. Group membership policy restrictions can be used to allow corporate users to gain network access based on one set of criteria, while users from a specific vendor or partner might have a different set of remote access restrictions
Time of day restrictions ensure that users can only log in at certain times. This can be used to prevent users from connecting during maintenance operations or to keep remote users out of the network after normal business hours.
Type of connection validation sets different remote access policies based on the method the user uses to connect, eg: VPN users could have one policy, while analog dialup users are subject to a different policy.
Access server identity validation ensures that users connecting to a particular access server have a specific policy applied to them. This can be used to ensure that a user is connecting through proper channels, eg: if someone was to attempt to break into the network through a non-authorised connection, this restriction would block them.
Access client phone number validation ensures the user is connecting from an authorized location or computer. Using the client's Calling Station ID) for validation relies upon a certain amount of physical security as well as password or certificate-based electronic security. Someone would need to break into the calling location and use that phone to connect based on this validation.
Connection Restrictions
Once a remote access policy has authorised a connection, it can set connection restrictions based on the following:
•Encryption strength
•Idle timeout
•IP packet filters
•Maximum session time
Remote access policies can also apply advanced connection restrictions based on
the following:
•IP address for PPP connections
•Static routes
Encryption strength can range from 40-bit to 168-bit. Encryption property settings for Windows Server 2003 include:
•no encryption
•Basic encryption (40-bit MPPE or 56-bit DES)
•strong encryption (56-bit MPPE or 56-bit DES)
•strongest encryption (128-bit MPPE or 168-bit 3DES).
Idle timeout is used to secure the network by disconnecting users after a specific amount of idle time has elapsed.
IP packet filters restrict connections based on the services being requested, eg: Telnet access may be granted to a dial-in user by configuring an IP packet filter to allow traffic to TCP port 23 at a specified address.
Maximum session time ensures security by disconnecting a user after a specified
amount of time regardless of the current session status (idle or active).
Specific IP addresses may be distributed through PPP connections to restrict access to portions of the network, providing another method for securing network access through remote access policy.
Static routes also set network access restrictions by routing or not routing specific
traffic based on destination network address
Global Remote Access Policies
Global remote access policies may be varied according to the following:
•Access client phone number or MAC address
•Authentication methods
•Group membership
•Identity of the access server
•Time of day
•Type of connection
•Whether or not unauthenticated access is allowed
Windows Server 2003 remote access servers provide remote access policy through the
Routing and Remote Access Service on stand-alone machines. The RRAS policy applies to connections through that specific RRAS server. If you are using IAS or RADIUS on your network, remote access policies are configured through the IAS or RADIUS server.
Remote access policies determine what users or machines gain access, through what method, when, and what restrictions are put on them once they have access. By default, two policies are created. One controls access to the remote access server itself and the other controls access to network resources outside of the remote access server.
You can also create your own policies to control access by right-clicking on remote access policies and selecting New Remote Access Policy. You will then be asked if you want to use the wizard to guide you through policy creation or you can choose to create a custom policy.
If you use the wizard, it will guide you through the process of creating the new policy. You will be asked questions like what service this is for (VPN, Ethernet, dial-up, wireless, etc.), is it for a group or individual users, what authentication protocols are to be used, what encryption methods are to be used and other settings, based on the type of remote connection you are configuring.
If you choose to create a custom policy, you will be asked to select the user or group that the policy applies to, then you will be prompted to create Conditions which determine when the policy is applied. For example, a policy might apply only to the group, say HR-users and it could be configured to assign them a different default gateway.
Configuring a remote access policy for an RRAS server
1.Configure the user accounts to use remote access policy for dial-in access.
2.Click Start > Programs > Administrative Tools > Active Directory Users and Computers.
3.Verify that the user accounts have the Remote Access Permission (Dial-in or VPN) option set to Control access through Remote Access Policy.
4.Open the Routing and Remote Access management console to configure the policy, then click Start > Programs > Administrative Tools > Routing and Remote Access.
5.If necessary, double-click Routing and Remote Access and the server name.
6.In the left pane, right-click Remote Access Policies, then click New Remote Access Policy.
7.Select the appropriate policy settings as discussed above.
8.Delete the default policies.
|The logbook for this section should provide a record of the steps you have taken to configure remote access authentication protocols to provide authentication for remote access clients and configure remote access policies to permit or deny access. Completion of activities in this section should provide sufficient evidence for these tasks.|
Thursday, November 4, 2010
Tuesday, October 26, 2010
Microsoft Forefront Endpoint Protection 2010 (beta): Installation Steps
Microsoft Forefront Endpoint Protection 2010~Introduction
Recently it was announced from the Forefront Insurance with implementation of the Beta program of the new antivirus solution for client or server operating system, Forefront Endpoint Protection 2010. Perhaps the most significant change I understand the fact of its operation. The previous version based its functionality as a component of Microsoft Operations Manager 2005. However, in this new version, based on System Center Configuration Manager 2007 for administration, deployment and monitoring. The change not only implies a change in product, but also a change in strategy for managing it. It may be far more appropriate for the concept and treatment through System Center Configuration Manager 2007 from Microsoft Operation Manager 2005 or its successor MS System Center Operation Manager 2007. With this leap in product is passed to a monitoring system to a complete management system. The scope of System Center Configuration Manager 2007 to all systems of an organization makes it more likely to have an agent installed and not the fact deploy SCOM 2007 agent, more oriented towards services and servers.
Installation Requirements
For the installation of Forefront Endpoint Protection 2010 requires the fulfillment of certain prerequisites:
•RAM: 2 GB minimum.
•Disk space: 1GB for service, 6 GB for the database and 6 GB for database reports.
•Operating system Microsoft Windows 2003 SP2 or later.
•No role of the previous version can be installed.
•It must not have any other anti-malware solution.
•Must be running Windows Installer version 3.1 or later.
•Microsoft .Net Framework 3.5. Service Pack 1.
•Microsoft SQL Server 2005 SP2 or 2008 Enterprise with the following components must be installed:
◦Analysis Services.
◦Integration Services.
◦Reporting Services.
◦SQL Server Agent.
•Must submit a site with Microsoft System Center Configuration Manager 2007 SP2 Release 2 with the role of SQL Server Reporting Services configured and installed and configured the following components:
◦hardware inventory.
◦distribution of software.
◦desired configuration management.
Keep in mind that although SCCM 2007 is a pure 32-bit component and can be installed in 64-bit operating systems, there Forefront Endpoint Protection version 32 and 64 bits. You must download and install the version for your operating system on which the server is running SCCM 2007.
Installation Process
The start of the installation is done through a wizard to guide you through the process. It is provided on the front page links to the deployment guides and use of the service agreements.

Once the license accepted the decision of the type of display you want done. This will provide four possibilities:
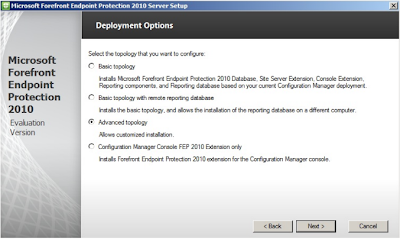
Depending on the type of topology design, following the wizard may vary. In the example shown to over the post, it was decided to use the advanced topology option. In this decision the following options, allows selection capabilities FEP 2010 MS wishing to settle.


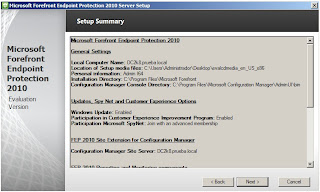
After satisfying the requirements of the wizard displays the processes that take place beginning the installation of Microsoft Forefront Endpoint Protection 2010.

Recently it was announced from the Forefront Insurance with implementation of the Beta program of the new antivirus solution for client or server operating system, Forefront Endpoint Protection 2010. Perhaps the most significant change I understand the fact of its operation. The previous version based its functionality as a component of Microsoft Operations Manager 2005. However, in this new version, based on System Center Configuration Manager 2007 for administration, deployment and monitoring. The change not only implies a change in product, but also a change in strategy for managing it. It may be far more appropriate for the concept and treatment through System Center Configuration Manager 2007 from Microsoft Operation Manager 2005 or its successor MS System Center Operation Manager 2007. With this leap in product is passed to a monitoring system to a complete management system. The scope of System Center Configuration Manager 2007 to all systems of an organization makes it more likely to have an agent installed and not the fact deploy SCOM 2007 agent, more oriented towards services and servers.
Installation Requirements
For the installation of Forefront Endpoint Protection 2010 requires the fulfillment of certain prerequisites:
•RAM: 2 GB minimum.
•Disk space: 1GB for service, 6 GB for the database and 6 GB for database reports.
•Operating system Microsoft Windows 2003 SP2 or later.
•No role of the previous version can be installed.
•It must not have any other anti-malware solution.
•Must be running Windows Installer version 3.1 or later.
•Microsoft .Net Framework 3.5. Service Pack 1.
•Microsoft SQL Server 2005 SP2 or 2008 Enterprise with the following components must be installed:
◦Analysis Services.
◦Integration Services.
◦Reporting Services.
◦SQL Server Agent.
•Must submit a site with Microsoft System Center Configuration Manager 2007 SP2 Release 2 with the role of SQL Server Reporting Services configured and installed and configured the following components:
◦hardware inventory.
◦distribution of software.
◦desired configuration management.
Keep in mind that although SCCM 2007 is a pure 32-bit component and can be installed in 64-bit operating systems, there Forefront Endpoint Protection version 32 and 64 bits. You must download and install the version for your operating system on which the server is running SCCM 2007.
Installation Process
The start of the installation is done through a wizard to guide you through the process. It is provided on the front page links to the deployment guides and use of the service agreements.

Once the license accepted the decision of the type of display you want done. This will provide four possibilities:
- Basic topology: All infrastructure will be implemented on a single server.
- Basic Topology database remote report: All except infrastructure reporting system that can be installed on another server.
- Advanced Topology: Defines the procedures for configuring the components of the Microsoft Forefront solution Endpoint Protection 2010.
- Install only the extensions of FEP 2010 for the console of System Center Configuration Manager.

Depending on the type of topology design, following the wizard may vary. In the example shown to over the post, it was decided to use the advanced topology option. In this decision the following options, allows selection capabilities FEP 2010 MS wishing to settle.

- Extension of MS Forefront Endpoint Protection 2010 for System Center: Integrating MS FEP 2010 in SCCM 2007 is done at multiple levels. Integrated into the software distribution procedures and analysis and security configuration through its components. These extensions allow the creation of collections, packages for distribution processes and the creation of objects and baselines used in the desired configuration.
- Service reports and alerts FEP 2010: Allows local installation of components for monitoring MS Forefront Endpoint Protection 2010.
- Installation of extensions EFF console in Configuration Manager 2010 for centralized management.
- The next step in the process is to define the parameters of creation of the database. Although the configuration such as packages or libraries will be integrated in the own database of System Center Configuration Manager with regard to management of alerts and threats will be stored in a new database. The server used is the same as that defined in SCCM 2007.

- After that it is time to define the processes of defining the data for the creation of database reports and account and service data for Reporting. For the process to be effective must have completed all the configuration requirements. If it is not so, as shown in the picture below will display a configuration error. To fix it, give permissions to the Network Service (Network Service) on the following file:
C: \ Program Files \ MicrosoftSQLServer \ MSSQL.3 \ ReportingServices \ ReportServer \ rsreportserver.config
The following process of installing MS Forefront Endpoint Protection 2010 is to define the service activation or upgrade to platforms and products and join the improvement program experience.


Within the procedures leading Microsoft for security management, one of them is the creation of SpyNet community. Through this you can be notified and know that others have made on the detection of a potential Malware. Membership allows you to send basic information or advanced improves applications in the fight against malware.
Enter the information sent is the result of the action takes effect, the impact of the threat, locations where lynx and others. The following illustration shows the options to join Microsoft SpyNet.
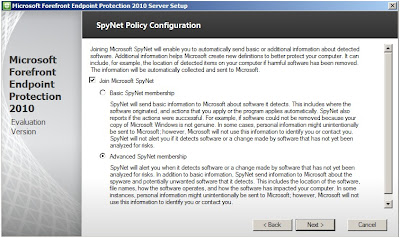

After the definition of politics SpyNet established, it is time to establish the parameters of the installation.

The last step before starting the installation is to check the prerequisites for installing the service. The following image shows an error and a warning in meeting the prerequisites. The warnings allow the start of the installation process, which did not happen to resolve the errors. Aid showing each warning and error, provides the procedures to be carried out to address them.

After satisfying the requirements of the wizard displays the processes that take place beginning the installation of Microsoft Forefront Endpoint Protection 2010.

Installation Complete
Finished the process, the installation of MS FEP 2010 implies also the configuration of antimalware client on the server automatically. The following image shows the Configuration snap added to the SCCM management console 2007 and the process of updating the antimalware engine in the operating system.
Finished the process, the installation of MS FEP 2010 implies also the configuration of antimalware client on the server automatically. The following image shows the Configuration snap added to the SCCM management console 2007 and the process of updating the antimalware engine in the operating system.

Subscribe to:
Posts (Atom)